Attendance list and attendance report (Meetings)
You can keep track of who is attending or has attended your meeting. As the meeting creator, you can create an attendance report if you want information about past meetings. This report lists everyone who has attended the meeting. If you are the meeting moderator, you can create an attendance list as a snapshot of the current meeting room.
Attendance list
As the meeting moderator, you can create a snapshot of the current participants by generating an attendance list in your meeting room. It lists all participants who are currently in the main room or in the subgroups. The participants are listed with their names and roles.
Create an attendance list
- Join the meeting room from which you want to create an attendance list via the App or Web Client.
- Click on the Participant list
 icon in the secondary menu in the top right corner.
 - Click on the context menu
 which appears when you hover over the room’s name.
 - Click on Copy attendance report to save the list of participants to the clipboard.
- Paste the list in your preferred text or data program.
Attendance report
You can create an attendance report for each meeting you have created. This report analyzes your participants’ meeting access information. You can generate a report up to 40 days in the past to analyze past meetings as well.
Create an attendance report
- Log in to your alfaview account on the administration page.
- Click on Meetings in the menu bar on the left.
- Filter the meeting list with the filter Ended to display all previous meetings for which you can create an attendance report.
- Click on the Context menu icon.
- Click on Get report. An automatically generated report is provided that covers the entire meeting duration and the time people can join before the meeting starts.
Generate a customised report
If you want to generate an attendance report for a specific period of time, you can use the custom selection.
- Click the calendar icon next to “From” and today’s date to set the start date.
- Select the start time from which you want to generate the report. If you do not enter a start time, the default time will be the start of the meeting.
- Click the button to confirm.
- Repeat the steps for the end time by clicking on the calendar icon next to “To”.
- Click the button to create your customized attendance report.
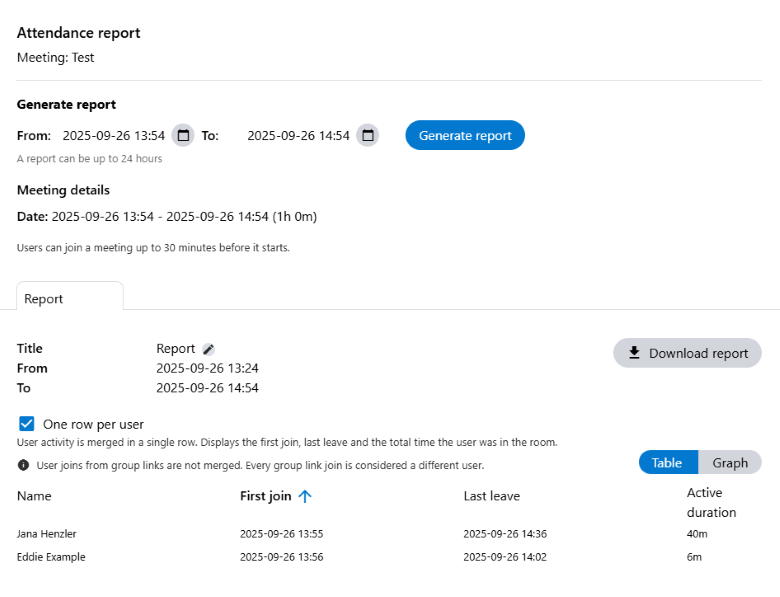
A new tab with the generated report will open at the bottom of the window. You will now see the following information about your report:
- Title
The title includes the name of your meeting and the date the meeting took place.
You can edit the title by clicking the ![]() Edit icon. Enter the new title. Then click the button. If you want to discard the changes, click on the button.
Edit icon. Enter the new title. Then click the button. If you want to discard the changes, click on the button.
- From
Here, you can see the start time of your report. - To
This line shows your report’s the end time. - One row per user
You can decide whether you want to display multiple entries from a single user in multiple rows or bundled together in one row. If you select a bundled display, the first meeting entry, the last meeting exit and the total time spent in the meeting will be displayed.
Tick the box to enable this feature.
Entries via group links cannot be aggregated. Each entry will be displayed in a separate line and therefore as an individual user.
You can display the attendance either as a table or as a diagram. Klick on the corresponding button above the list of all entries to switch between the two options.
Download the attendance report
- Go to the tab of the report you want to download.
- Click the button.
The download will be saved as an Excel file by default. If you would prefer a PDF version of the report, please tick the Print or save PDF box.
- Select the information you want to include in your report by ticking the boxes labelled Include report details and/or Include dates as UNIX.
| Include report details | Include dates as UNIX |
|---|---|
| Name of the participant | Time of entry in seconds in UNIX-format |
| Time of entry | Time of exit in seconds in UNIX-format |
| Time of exit | |
| Period of attendance in hours and minutes | |
| Period of attendance in seconds |
If you select the Include dates as UNIX option, all the general report details will also be included in your report.
- Select whether the data should be separated by a comma or semicolon.
- Click the button.
You will find your report as an Excel or PDF file in your download folder.
Last updated on November 20th, 2025, 08:40 am