Guest and group links
You can invite participants to join a conference in alfaview with a guest or group link. The participants with guest or group links do not need to create an alfaview account to join a conference. Invitees will be sent an e-mail with the invitation link and further instructions on how to use alfaview and how to join a conference.
Guest links
Guest links are personalized, which means that each link can only be used by one person. You enter the name of the invited person when creating the link and the invited person cannot change their name themselves. The link can only be used by one person at a time.
Guest links can be created in the Room management. To create a guest link, please follow the instructions below:
- Log in to your alfaview account on the administration page.
- Click on Rooms in the menu bar on the left.
- From the list of all accessible rooms, select the alfaview room for which you want to create a guest link.
- Click on
 Settings.
 - Click on the Guest links tab. In this tab, you can view existing links, edit existing links, and delete them.
- To create a new link, click on the button.

If you do not want the invitation link to be emailed automatically, uncheck the box next to the email address field. You can copy the invitation link later and send it to the invitee by using your preferred communication medium.
- Enter the email address and name of the person you want to invite. Select a role from the drop-down menu. You can select the preferred language from the drop-down menu next to the role menu.
- You can select a start and end date. If you do this, the guest link will only be valid for the selected period.
- To delete a guest link, click on the trash can icon.
- Click on the button to create the guest link.
Create guest links by using CSV or XLSX file
If you are planning to invite multiple people at the same time using a CSV or XLSX file may be better for you.
- In the Invite guests window, click on Upload CSV file.
- You can now choose to enter the details manually or upload a CSV or XLSX file.
To ensure that the invitation links are created correctly, please ensure that you have the following details in your file:
- E-mail address: Enter only one valid email address per line.
- Name: Enter the name of the person you are inviting.
- Role: You must enter a role. The available roles are “Moderator, Participant, Spectator, Guest, No access”.
- Send email: If you want the invitation link to be emailed automatically, enter “true” in this field. Any other value will be ignored.


Optional entries:
- Start date: You can enter a start date. The link will only be valid from this date and time. Please enter the date in the format „DD.MM.YYYY HH:mm“. This setting can be configured at a later stage.
- End date: You can enter an end date. The link will only be valid until this date and time. Please enter the date in the format „DD.MM.YYYY HH:mm“. This setting can be configured at a later stage.
- Locale: You can choose between English and German and enter the language in this field.
Edit guest links
You can edit, re-send and delete previously created guest links. If you delete a link, it will change to inactive status and will no longer be valid. You can either edit the links individually or you can edit several links at the same time.
Set date
You can edit the period during which the link is valid even after creating it. Alternatively, you can delete the period you set when creating the link. To do so, click the clock icon, select the date and time for either the start or end date or clear the selected date. You can deactivate the link by clicking on Expire link now.
Copy link
You can copy the guest link by clicking the ![]() Copy link icon. You can then send the guest link via your preferred communication medium.
Copy link icon. You can then send the guest link via your preferred communication medium.
Role
You can change the selected role of the participant. Select the new role from the drop-down menu. The changes are automatically saved and the link is updated accordingly.
Resend invitation email / Delete guest link
There are two additional functions available in the context menu:
Resend invitation email
The guest link will be resent immediately after you click on this function.
Delete guest link
Clicking on this function allows you to delete the previously created guest link. Confirm the deletion by clicking the button in the new window.
Update multiple links
- If you want to edit several links at the same time, click on the switch next to Update multiple links.
- Now select the links you want to update by clicking in the corresponding box. If you want to update all links, click in the box next to Select all.
- You can now set the time period, let the link expire or assign a new role and save the changes by clicking on the button.
- If you want to delete the selected links, click on the button. Then click on the button to delete the links.

Group links
Group links can be used by several people at the same time to enter an alfaview room. They are also useful if you want to assign a role to many people at the same time.
Group links can be created in the Room management. To create a group link, please follow the instructions below:
- Log in to your alfaview account on the administration page.
- Click on Rooms in the menu bar on the left.
- From the list of all accessible rooms, select the alfaview room for which you want to create a group link.
- Click on the Settings icon.
- Click on the Group links tab. In this tab, you can view existing links and delete them.
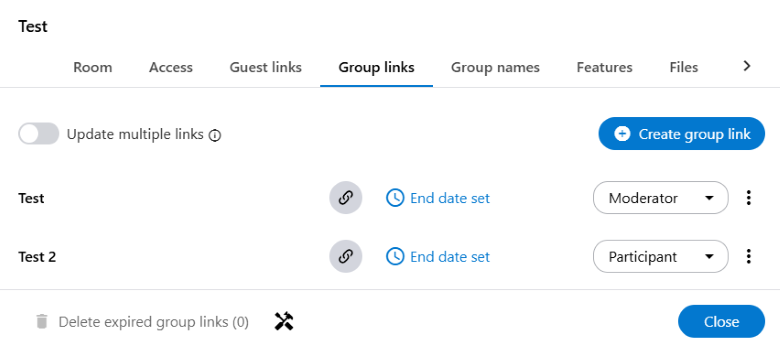
Create group links
You can create group links by clicking on the button.
- Enter a name for the link in the input box.
- From the drop-down menu, select the role that you want users to have when they join using this link.
- Click on the button.
- To edit the end date, click on the
 Edit icon.
 - By clicking on the
 Delete icon, you can delete the end date. We recommend always setting an expiration date for your security.
 - The quick settings Expire in 24h, Expire in a week and Expire in 30 days are also available.
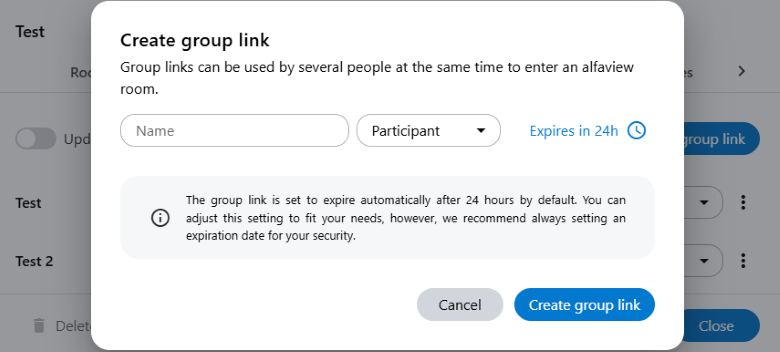
The group link is set to expire automatically after 24 hours by default. You can customize the end date and time.
Once created, the group link will appear in the list below. You can copy the link by clicking the ![]() Copy link icon and send it to the participants using your preferred communication medium.
Copy link icon and send it to the participants using your preferred communication medium.
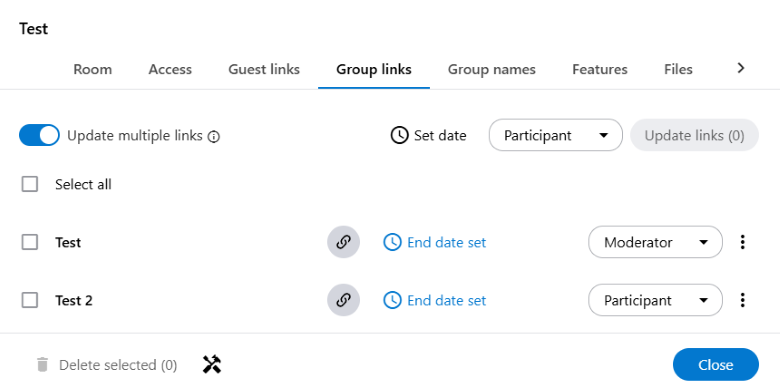
Edit group links
Once you have created a group link you can edit it in the list. You can either edit the links individually or you can edit several links at the same time. The following settings are available:
Copy link
You can copy the group link by clicking the ![]() Copy link icon. It is then saved to your temporary storage and you can send the group link via your preferred communication medium.
Copy link icon. It is then saved to your temporary storage and you can send the group link via your preferred communication medium.
Set date
You can edit the period during which the link is valid even after creating it. Alternatively, you can delete the period you set when creating the link. To do so, click the clock icon, select the date and time for either the start or end date or clear the selected date. You can deactivate the link by clicking on Expire link now.
As soon as the link expires, it will no longer possible to enter an alfaview room using that link.
Role
You can change the selected role of the participants. Select the new role from the drop-down menu. The changes are automatically saved and the link is updated accordingly.
If you select No access as the role, all participants who have used this link to join an alfaview room will automatically lose access to the alfaview room and will be permanently removed. They can only join again with this link if you change the role.
Rename group link / Delete group link
There are two additional functions available in the context menu:
Rename group link
Click on the context menu and then on Rename group link. You can now click on the field with the original group description. Enter the new description and save the changes by clicking the button.
Delete group link
Click on the context menu and then on Delete group link. Confirm the deletion by clicking the button in the new window.
Once the room has reached its allotted number of participants, each additional participant automatically becomes a spectator until the room reaches its maximum capacity.
Update multiple links
- If you want to edit several links at the same time, click on the switch next to Update multiple links.
- Now select the links you want to update by clicking in the corresponding box. If you want to update all links, click in the box next to Select all.
- You can now set the time period, let the link expire or assign a new role and save the changes by clicking on the button.
- If you want to delete the selected links, click on the button. Then click on the button to delete the links.
Last updated on July 2nd, 2026, 07:47 am