Recording and Streaming
Recording and streaming allows you to record conversations in the alfaview room or meeting locally or share them directly on streaming platforms such as YouTube, Twitch or a server. To use this feature, it must be activated by a room administrator in the room management section. Furthermore, only moderators can start a recording.
Recording & Streaming off![]() Recording & Streaming is displayed in grey.
Recording & Streaming is displayed in grey.
Recording & Streaming on
The stop recording icon is displayed in red. A timer also shows how long the recording has been running.
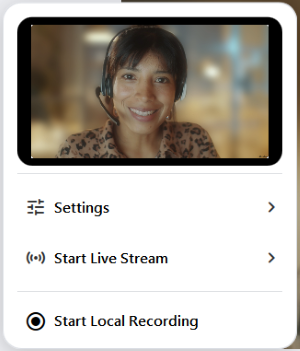
To start a recording or stream, click on the ![]() Recording & Streaming icon in the status menu. A selection window will open where you can configure settings and choose whether to start a Local Recording or a Live Stream.
Recording & Streaming icon in the status menu. A selection window will open where you can configure settings and choose whether to start a Local Recording or a Live Stream.
As soon as a video recording is to be started, a recording legal notice appears. You can only start recording once you have read and confirmed this notice.

Settings for Recording and Streaming
Before you start recording or streaming, you can make various adjustments in the settings.
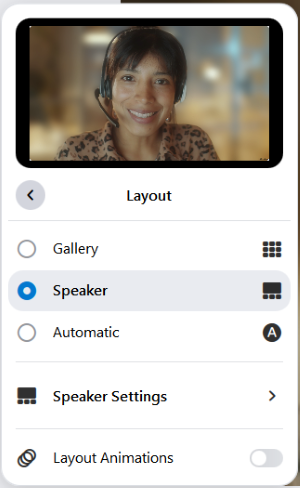
Layout
With the layout settings, you can decide on the appearance of your recording. You can display participants as a gallery or in speaker view. In addition, you have the option of selecting the Automatic setting. The preview is provided directly in the selection window.
Use the slider to activate Layout Animations for a smooth transition when speakers change.
The layout can also be changed during a recording.
Speaker Settings
Use the Speaker settings to enable or disable the thumbnail bar and picture-in-picture on shared content. Do this by checking the box to the left of the respective setting. You can also change the size and position of the picture-in-picture display on shared content.
The speaker settings can be changed whilst recording is in progress.

Participants
Using the check boxes, you can specify the extent to which participants’ names and videos should be shown in the recording. The following options are available.
- VIP Name Labels on/off
- Participants Name Labels on/off
- VIP Videos Only
If you select VIP Videos only, but there is no VIP in the room, the video will be replaced by the alfaview logo.
- Hide My Video
You can see a preview of the recording in the mini window. By clicking on this preview image, the Recording and Streaming Monitor will open. This also offers all options for adjusting the settings.
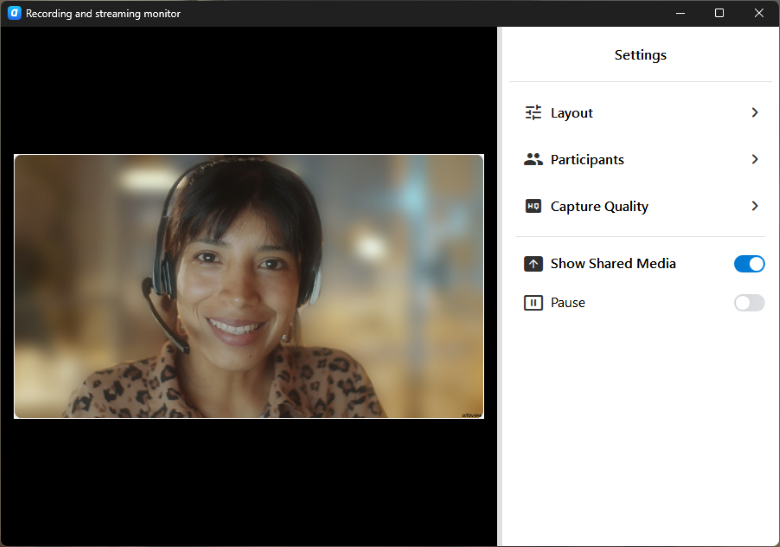
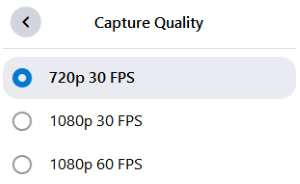
Capture Quality
Decide on the quality you want your video to be recorded in. You can choose between 720p 30 FPS, 1080p 30 FPS and 1080p 60 FPS.
The default setting is 720p 30 FPS. Please note: The higher the video quality, the higher the system requirements and the larger the video file.
Show Shared Media
You can also specify whether shared content should be recorded in the room. The function is enabled when the slider is blue.

Pause
To pause the recording, select Pause in the settings. When the slider is displayed in blue, the function is active. During the pause, the video shows a blue background with the alfaview logo, and no sound is recorded. To end the pause, click on the slider again. The function is deactivated when the slider is displayed in grey again.

Local Recording
To start a Local Recording, click on ![]() Recording & Streaming in the status menu. A selection window will open where you can configure settings and choose whether to start a Local Recording or a Live Stream.
Recording & Streaming in the status menu. A selection window will open where you can configure settings and choose whether to start a Local Recording or a Live Stream.
If ![]() Recording & Streaming is not displayed in the status menu, the feature has to be activated for the room first. To do so, use the room features in the administration or directly in the host tools in the status menu of the room.
Recording & Streaming is not displayed in the status menu, the feature has to be activated for the room first. To do so, use the room features in the administration or directly in the host tools in the status menu of the room.
To start a recording, you need to be a moderator for the room.
- Click on
 Start Local Recording.
 - Read the recording legal notice carefully and confirm it by ticking the box next to ‘I acknowledge my responsibility for recording consent’ and clicking on .
- You can also adjust the layout settings or pause while recording. To do this, click on
 to open the selection window and open the
  Settings.
When paused, the video shows a blue background with the alfaview logo; no sound is recorded during the pause.

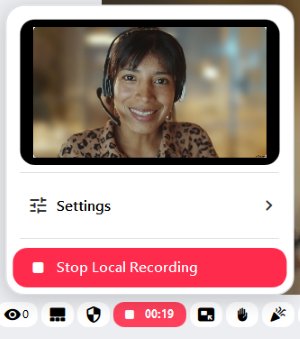
- To stop recording, click on the red Stop Local Recording button in the selection window.
- The finished recording is now saved directly to your PC. Once you’ve finished recording, the save folder will open automatically. You can also find your recordings in the alfaview video folder.
You can also use the Recording and Streaming Monitor to moderate recordings. This pop-out window opens by clicking on the preview image. Here you will also find all the setting options.
Live Stream
To transmit your alfaview video directly to a streaming platform, click on ![]() Recording & Streaming in the status menu. A selection window will open where you can configure settings and choose whether to start a Local Recording or a Live Stream.
Recording & Streaming in the status menu. A selection window will open where you can configure settings and choose whether to start a Local Recording or a Live Stream.
If ![]() Recording & Streaming is not displayed in the status menu, the feature has to be activated for the room first. To do so, use the room features in the administration or directly in the host tools in the status menu of the room.
Recording & Streaming is not displayed in the status menu, the feature has to be activated for the room first. To do so, use the room features in the administration or directly in the host tools in the status menu of the room.
To start a live stream, you need to be a moderator for the room.
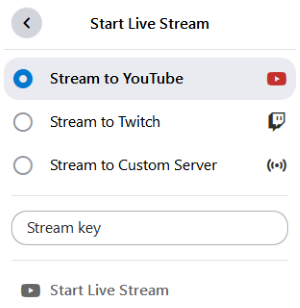
Streaming platform
- Click on
 Start Live Stream.
 - Select the platform you want to stream to.
- Enter your Stream Key.
- Click on Start Live Stream.
- Read the recording legal notice carefully and confirm it by ticking the box next to ‘I acknowledge my responsibility for recording consent’ and clicking on .
- The video is streamed directly to the selected platform.
You can see a preview of the recording in the thumbnail. By clicking on the preview image, the recording and streaming monitor will open. Here you will also find all the settings options.

- You can also adjust the layout settings or pause while recording. To do this, click on to open the selection window and open the Settings.
When paused, the video shows a blue background with the alfaview logo; no sound is recorded during the pause.
- To stop recording, click on the red Stop Live Stream button in the selection window.
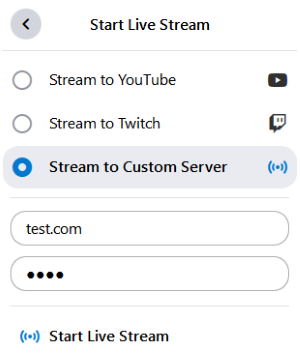
Stream to a server
- Click on Start Live Stream.
- Select Stream to Custom Server.
- Enter the Server URL.
- Enter your Stream Key.
- Click on Start Live Stream.
- Read the recording legal notice carefully and confirm it by ticking the box next to ‘I acknowledge my responsibility for recording consent’ and clicking on .
- The video is streamed directly to the selected server.
You can see a preview of the recording in the thumbnail. By clicking on the preview image, the recording and streaming monitor will open. Here you will also find all the settings options.
- You can also adjust the layout settings or pause while recording. To do this, click on to open the selection window and open the Settings.
When paused, the video shows a blue background with the alfaview logo; no sound is recorded during the pause.
- To stop recording, click on the red Stop Live Stream button in the selection window.
Last updated on March 26th, 2026, 01:01 pm