Screen and audio share
With the screen sharing feature, an area of your screen can be captured and shared with other participants in an alfaview room.
For macOS screen recording has to be allowed in the system settings.
You can find more information here: Permission for screen sharing on macOS.
It is also possible to share your computer’s sound. To be able to do so you need Windows 10 build 21H1 or higher. On macOS devices, sound sharing can be enabled via the Feature previews.
Screen share off
Screen share symbol grey.
Screen share on
Screen share symbol blue.
Screen share with sound on
Blue screen share symbol with speaker icon.
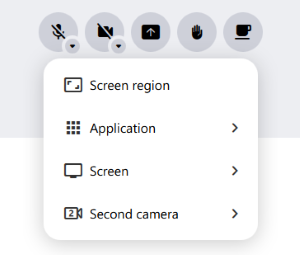
To start a screen share, click on the ![]() Share screen icon in the main menu to open the context menu.
Share screen icon in the main menu to open the context menu.
The context menu will list all available screen share options.
The following screen share options are available:
To share your sound, click on the speaker symbol in the screen share context menu. To stop the sharing of sound, click the speaker icon in the context menu again.
When you share the whole screen on which you opened alfaview, the alfaview main window minimizes automatically and the Mini window opens.
Multiple screen shares simultaneously
- If more than one screen share is active, minimised preview images appear at the bottom of the stage area (gallery view) or below the person speaking (speaker view).
- To magnify a screen share, click on a thumbnail.
- The active screen share is indicated by a blue frame around the preview image.
- The preview images contain the name of the participant who shares the screen.
- Each participant can individually decide which screen share should be displayed on the stage.

Display screen share in a separate window
- To display an active screen share in a separate window, click on the
 undock icon in the top right corner of the screen share video.
 - The screen share is now displayed independently of the main window of the alfaview app and can be placed on an external monitor for example.
- To display the screen share in the main window again, simply close the undocked window.
- The last used setting will be reapplied. If the screen share was last used in a separate window, a new screen share will also be displayed in a separate window.
- To bring the undocked screen share window to the foreground, click on the
 gather icon in the status menu.
Application share
Application share allows you to share a running application with all participants in a room.
Only one application will be shared at a time. Every other running program or content won’t be visible to the participants.
- Click on the
 Share content button in the main menu.
 - Now click on the button. All running applications are now displayed either in the grid layout or in the list layout.
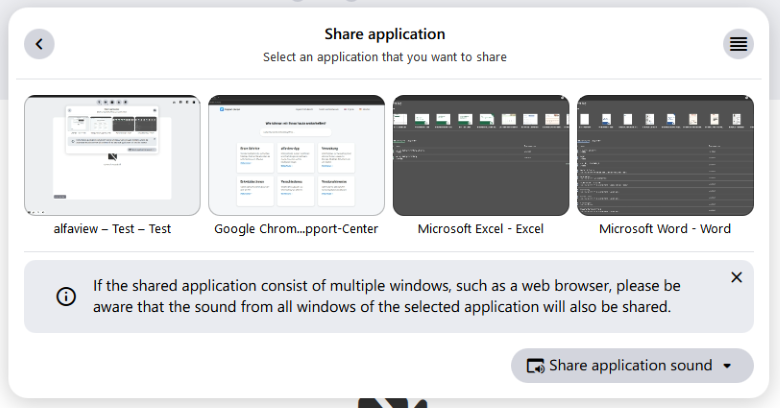
Grid Layout
You are presented with large preview videos from all running applications.
List Layout
A list displaying the names of all running applications along with a small preview video is shown.
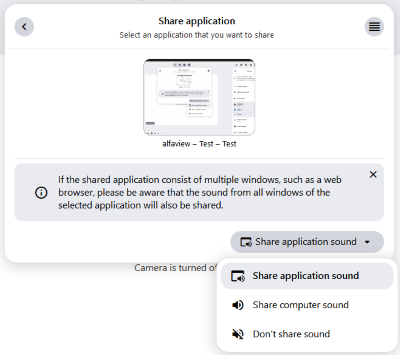
- You can decide whether you want to share your computer’s sound. To do so, click either on the , or button in the selection menu.
- Select the application you want to share.
Note: Once you have selected an application, transmission will begin immediately.
- To stop the video transmission, click the
 Share content icon in the main menu.
 - Then click the red button in the screen share menu.
Audio selection
- Share application sound
Only the audio of your chosen application gets shared. Every other audio source will not be shared. - Share computer sound
All of your computers audio will be shared. - Don’t share sound
No audio will be shared.
Region share
Preparation
The Screen region feature allows you to share a specific region of your screen with the other participants in the room.
- Click on the Share content button in the main menu.
- When you hover your mouse over the button in the drop-down menu, a speaker icon will appear. This allows you to choose whether or not to share the computer’s audio.
- Now click on .
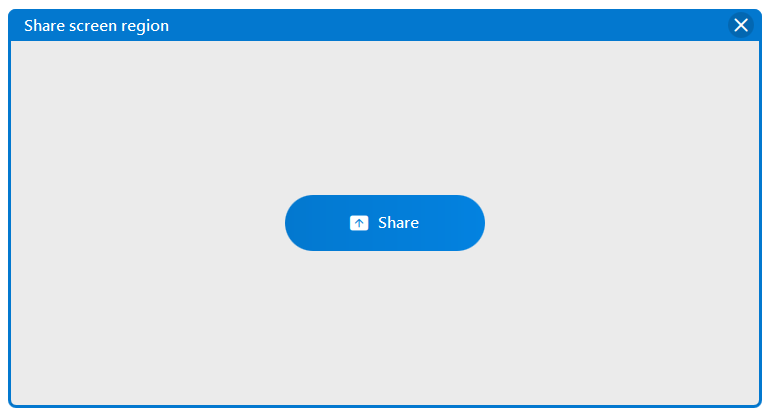
- The blue selection frame opens.
- Move the selection frame to the position on your screen that you want to share.
- Modify the frame size by dragging the sides and corners of the frame.
- If you want to cancel the process, click on the
 close icon in the top right corner of the selection frame.
Start & stop
- Start the screen share by clicking on the button in the middle of the selection frame.
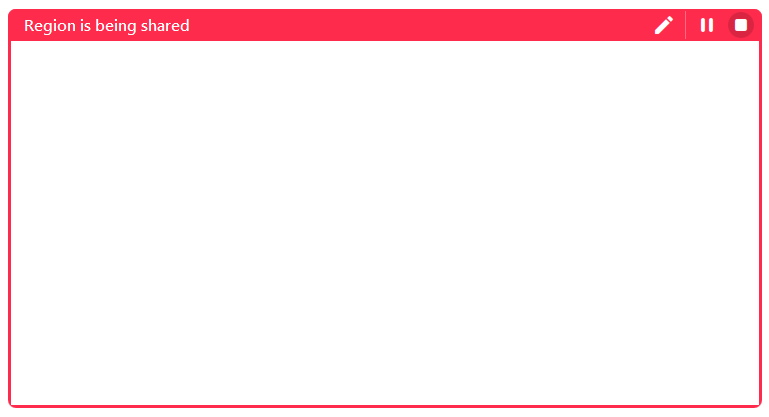
- As soon as the selection frame turns red, the screen share becomes visible to all participants.
- To end screen share, click on the
 stop icon. The selection frame remains open so that you can select a new region to share.
 - Alternatively, click on the Share content button in the main menu. Then, click on the button in the selection menu.
The selection frame can be resized or moved to another area without ending the screen share.
Pause & resume
- To pause the screen share, click on the
 pause icon in the selection frame.
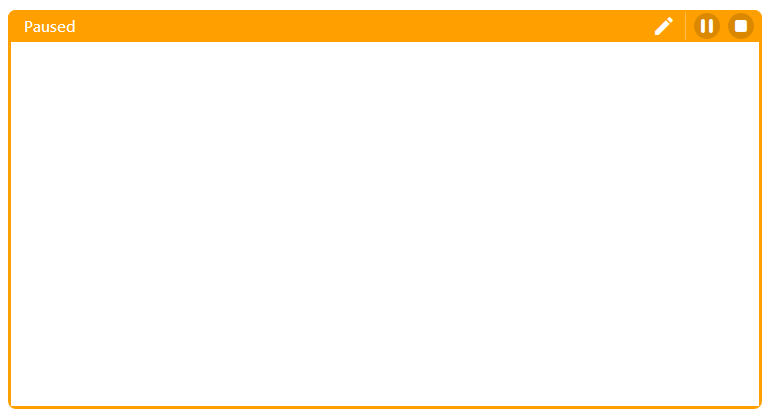
 - When the screen share is paused, the participants will see a still image and the selection frame turns yellow.
- To resume the screen share, click on the resume icon in the selection frame.
Annotate
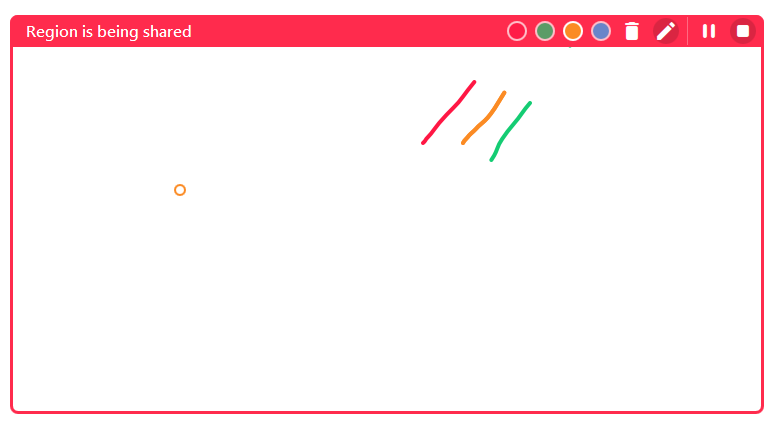
- To use the annotation feature, click on the
 annotation icon in the selection frame.
 - With the mouse button pressed, draw a line inside the selection frame. Release the mouse button to stop drawing.
- You can choose between the colours red, green, yellow and blue. The colours can be selected in the title bar of the selection frame.
- To clear the annotations and exit the feature, click on the annotation icon again.
- When the annotation feature is enabled, the application under the selected frame cannot be accessed.
Important:
- The annotations become visible to all participants instantly.
- Only the user who started the screen share can annotate.
Share whole screen
- Click on the Share content icon in the main menu.
- Open the selection menu by clicking on the button. All available screens are now displayed either in the grid layout or in the list layout.
Grid Layout
You are presented with large preview videos from all connected screens.
List Layout
A list displaying the numbers of all connected screens along with a small preview videos is shown.
- You can decide whether you want to share your computer’s sound. To do so, click either on the or button in the selection menu.
- Select the screen you want to share.
Note: Once you have selected a screen, transmission will begin immediately.
- To stop the video transmission, click the Share content icon in the main menu.
- Then click the red button in the screen share menu.
When you share the screen on which you opened alfaview, the alfaview main window minimizes automatically and the Mini window opens.
Second camera
Instead of screen sharing, you can also share the video from a second camera with the other participants.
- Click on the Share screen icon in the main menu to access the screen sharing selection list.
- Click on the button. All cameras are now displayed either in the grid layout or in the list layout.
Grid Layout
You are presented with large preview videos from all connected cameras.
List Layout
A list displaying the names of all connected cameras along with a small preview video is shown.
- Click on the or button at the bottom right to open the drop-down menu. Select whether you want to transfer the sound.
- Start the transfer of the video by clicking on the preview video (Grid layout) or on the blue button (List layout).
As soon as you click on a preview video, the video transmission will begin. The screen icon in the main menu will then be displayed in blue ![]() .
.
- To stop the video transmission, click Share screen icon in the main menu to open the screen sharing selection list.
- Then click the red button.
Last updated on April 1st, 2026, 09:08 am