Add-In for Microsoft Outlook 365
Notes on installing the Outlook add-in
Go to the chapter Outlook Add-In Usage.
The alfaview Outlook add-in is available for the following apps:
- Outlook 2016 on Mac and Windows
- Outlook 2019 on Mac and Windows
- Outlook 2021 on Mac and Windows
- Outlook on Mac and Windows (Microsoft 365)
- Outlook on the web
In order to use the alfaview Outlook add-in with an Exchange on-premise solution, Exchange Server 2016 or later is required. Older versions are not supported.
At the moment the Outlook add-in is not yet compatible with the mobile platforms (iOS/Android).
We provide an alfaview add-in for Microsoft Outlook 365. The add-in allows you to create alfaview meetings directly in your Microsoft Outlook 365 calendar and to send the meeting link to your participants.
More information on the alfaview meeting function can be found here: Meetings.
Once you have logged in to the add-in, you will remain logged in for 30 days.
Installation via Microsoft AppSource
The alfaview Outlook add-in is available in Microsoft AppSource here:
https://appsource.microsoft.com/product/office/WA200005288
Manual installation using the XML manifest file
To install the alfaview add-in manually you need the XML manifest file.
The instructions below will guide you through the installation process.
- Log into the alfaview administration interface .
- Select the point Company from the menu.
- Select the add-ins tab.
- Click on the button to download it.
As an Outlook 365 user
Please note that the installation of add-ins must be approved by your administrator.
You can find more information on installing Outlook add-ins in the Microsoft Supportcenter.
- Open Microsoft Outlook 365.
- Click on Get add-ins.
- Select my add-ins in the menu.
- Scroll down to the Custom add-ins area.
- Click on add a custom add-in.
- Click on add from file.
- Select the previously downloaded xml file.
- Confirm the privacy warning by clicking on install.
- The add-in is now installed and can be managed under the my add-ins tab.
As an Outlook 365 administrator
As an administrator of Microsoft Office 365, you can roll out the alfaview add-in for your users.
More information on deploying Outlook add-ins can be found in the Microsoft Supportcenter.
- Open the Microsoft Office 365 Admin Center.
- Go to settings.
- Choose integrated apps from the menu.
- Click on deploy add-in.
- Choose the app-type Office-Add-In in the dropdown menu.
- Choose Deploy Manifest file (.xml).
- Click on add from file.
- Choose the previously downloaded xml file and click on next.
- Assign the desired users or groups and click on next.
- Accept the permissions requirements and click on next.
- Review the details and click on Finish Deployment.
- The add-in is now available to your users.
Additional firewall and proxy configuration
When using a proxy or firewall, you may need to enable or configurate certain Microsoft endpoints.
For more information, please refer to the web page Microsoft 365 URLs and IP address ranges.
Exchange Server installation information
Please note that it can take up to 72 hours for a new add-in deployment, add-in updates, changes from turn on or turn off, or add-in removals to reflect for users.
For more information, please refer to the following Microsoft support articles:
- Install or remove add-ins for Outlook for your Exchange 2013 organization
- Add-ins for Outlook in Exchange Server
Outlook add-in usage
We provide an alfaview add-in for Microsoft Outlook 365. The add-in allows you to create alfaview meetings directly in any Microsoft Outlook 365 calendar you manage and send the meeting link to the participants.
More information on the alfaview meeting function can be found here: Meetings.
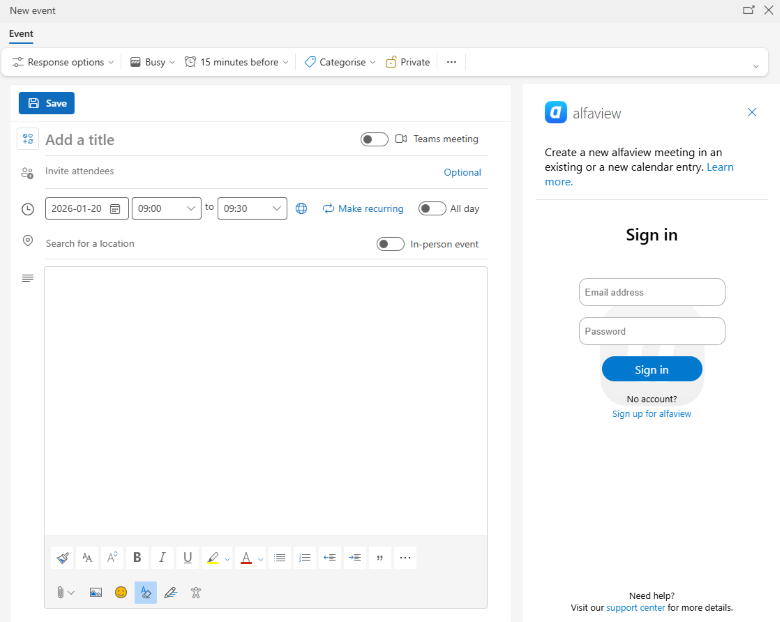
First login
- Open your Microsoft Outlook 365 calendar and create a new calendar event.
- Click on the alfaview symbol in the ribbon menu (you might have to expand the menu using the three dots to see the alfaview icon).
- When using the add-in for the first time you have to login first. Click on .
- Login with your alfaview account.
Once you have logged in to the add-in, you will remain logged in for 30 days.
Create a meeting
- Open your Microsoft Outlook 365 calendar and create a new calendar event.
- Edit your meeting details and add your participants.
- Click on the alfaview symbol in the ribbon menu (you might have to expand the menu using the three dots to see the alfaview icon).
- Click on .
- Your meeting will now be created and can be sent with your event details.
- You can now see your meeting in the alfaview room list.
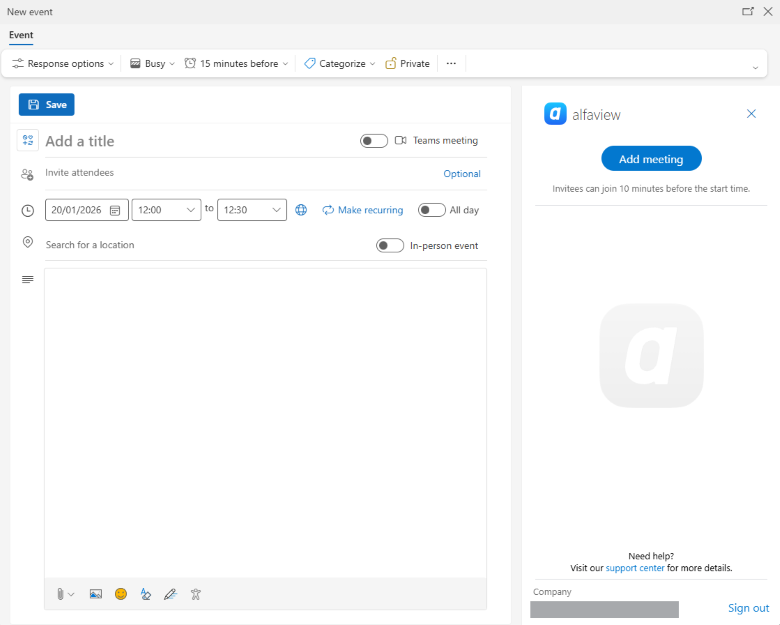
Do not remove the location from the event details or your participants will not be able to join your meeting.
Create recurring meetings
- Open your Microsoft Outlook 365 calendar and create a new calendar event.
- Edit your meeting details and click on “Make recurring”. A window opens where you can set the recurrence rate for your meeting.
- Add your participants.
- Click on the alfaview symbol in the ribbon menu (you might have to expand the menu using the three dots to see the alfaview icon).
- Click on .
- Your meeting series will now be created and can be sent with your event details.
- You can now see your meeting series in the alfaview room list.
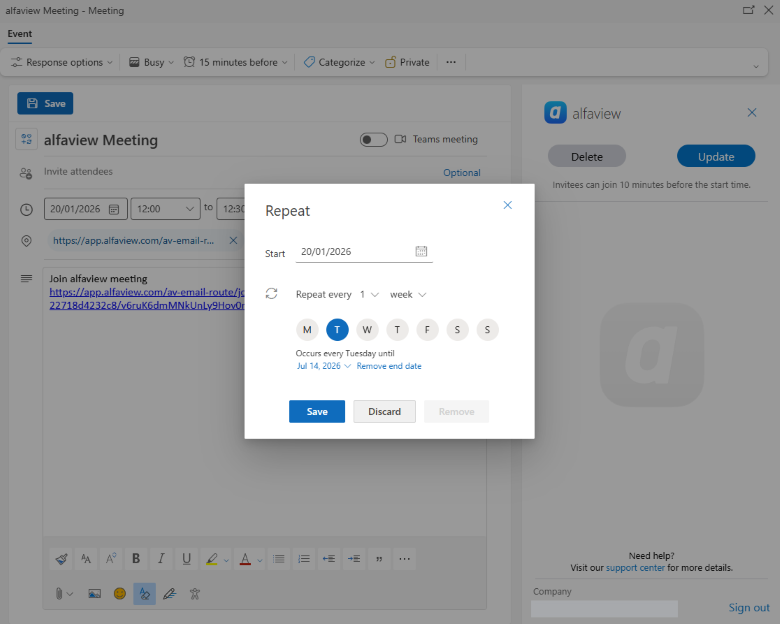
Recurring meetings always take place in the same meeting room.
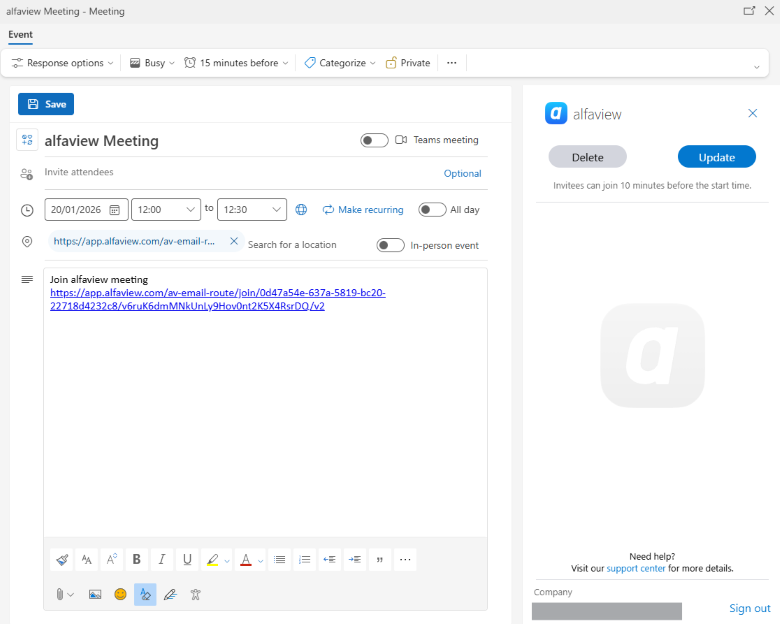
Edit a meeting
- Open your Microsoft Outlook 365 calendar and choose the calender event you want to change.
- Click on “Edit” to change your meeting details.
- Click on the alfaview symbol in the ribbon menu (you might have to expand the menu using the three dots to see the alfaview icon).
- Click on to apply your changes to your alfaview meeting.
Delete a meeting
- Open your Microsoft Outlook 365 calendar and choose the calender event your want to delete.
- Click on “Edit” to open the meeting details.
- Click on the alfaview symbol in the ribbon menu (you might have to expand the menu using the three dots to see the alfaview icon).
- Click on .
- To confirm click on .
Last updated on February 4th, 2026, 09:09 am